【Polymer 1.0】データバインディング
目次
バインディングアノテーション
バインディングアノテーションは、中括弧{{}}または角括弧[[]]でプロパティ名またはサブプロパティ名を囲ったもので構成されます。
- 角括弧
[[]]はone-wayバインディングを作成します。データの流れは、「ホスト→子エレメント(host-to-child)」のように下に向かって流れます。つまり子エレメントで変更された値がホスト側に反映されることはありません。 - 中括弧
{{}}は自動バインディングを作成します。カッコ内に指定されたプロパティの設定によってone-wayまたはtwo-wayバインディングが自動で選択されます。
次の例では、子エレメントのnameプロパティと、ホストエレメントのmyNameプロパティをバインドしています。
<child-element name="{{myName}}"></child-element>
バインディングの指定にはHTML属性を使用しますが、値はJavaScriptのプロパティに設定され、エレメントのHTML属性に設定されるのではないことに注意してください(プロパティではなくHTML属性に値をバインドしたい場合は「属性のバインディングアノテーション」を参照ください)。
属性名とプロパティ名は「プロパティ名と属性名のマッピング」で説明したようにマッピングされます。キャメルケースのプロパティをバンドするには、ダッシュケース(-を使用する書き方)を使用してください。
<!-- <user-view>.firstName = this.managerName; と同じ意味 -->
<user-view first-name="{{managerName}}"></user-view>
テキストコンテンツへのバインディング
エレメントのtextContentへバインドするには、エレメントのタグとタグの間にバインディングアノテーションを記述してください。textContentへのバインディングは常にone-wayでhost-to-childです:
<dom-module id="user-view">
  <template>
    First: <span>{{first}}</span><br>
    Last: <span>{{last}}</span>
  </template>
  <script>
    Polymer({
      is: 'user-view',
      properties: {
        first: String,
        last: String
      }
    });
  </script>
</dom-module>
<user-view first="Samuel" last="Adams"></user-view>

Compoundバインディング
文字列リテラルとバインディングを組み合わせることができます。次の例では、エレメントの属性の設定と、テキストコンテンツの中で、バインディングが合成されています:
<img src$="https://www.example.com/profiles/{{userId}}.jpg">

<span>Name: {{lastname}}, {{firstname}}</span>
Compoundバインディングは、個々のバインディングの値が変化すると再評価されます。undefinedは空文字として評価されます。
Compoundバインディングは、[[]]、{{}}、両方のアノテーションを使用することができますが、どちらも常にone-wayで、host-to-targetです。
サブプロパティのバインディング
以下の例のように、バインディングアノテーションはサブプロパティへのパスを含むこともできます(詳細は構造化データのバインディングを参照ください)。
<dom-module id="main-view">
  <template>
    First: <span>{{user.first}}</span><br>
    Last: <span>{{user.last}}</span>
  </template>
  <script>
    Polymer({
      is: 'main-view',
      properties: {
        user: {
          type: Object,
          value: function () {
            return {first: 'Taro', last: 'Yamada'};
          }
        }
      }
    });
  </script>
</dom-module>

プロパティの変更通知とtwo-wayバインディング
Polymerはtwo-wayバインディングをサポートします。これにより子エレメントで変更したデータが上位に伝播し、ホストエレメントのデータを変更することを可能にします。
two-wayバインディングを行いたくない場合は、角括弧[[]]を使用してください。これによりone-way(host-to-child)バインディングになります。
two-wayバインディングを行うには、ホストエレメントと子エレメントが以下の3つの条件を満たす必要があります:
ホストエレメント内の子エレメントのバインディングには中括弧
{{}}を使用する必要があります。もし角括弧[[]]を使用した場合、その子エレメント内のエレメントで中括弧{{}}を使用していたとしても、結果的にone-way(host-to-child)バインディングになります。子エレメントのプロパティの変更を上位へ伝播させるには、プロパティ設定で
notifyフラグをtrueに設定する必要があります(それか<property>-changed カスタムイベントを送出してください)。notifyフラグを持たない場合はone-way(host-to-child)になります。バインドされる子エレメントのプロパティは、
readOnlyフラグをtrueに設定してはいけません。(Note: もしバインドされる子エレメントのプロパティ設定がreadOnly: trueの場合は、one-way(child-to-host)になります。つまりホストエレメントから子エレメントへデータは伝播されず、逆に子エレメントからホストエレメントへのみデータが伝播されるバインディングになります。)
例1 two-wayバインディング(双方向):
このサンプルでは、hostPropの変更がchildPropへ伝播し、逆にchildPropの変更がhostPropへも伝播します。
<script>
  Polymer({
    is: 'child-element',
    properties: {
      childProp: {
        type: String,
        notify: true
      }
    }
  });
</script>
<dom-module id="host-element">
  <template>
    <!-- "hostProp"の値が、下位である子エレメントの"childProp"へ伝播する -->
    <!-- "childProp"の値が、上位であるホストエレメントの"hostProp"へ伝播する -->
    <child-element child-prop="{{hostProp}}"></child-element>
  </template>
  <script>
    Polymer({
      is: 'host-element',
      properties: {hostProp: String}
    });
  </script>
</dom-module>
例2 two-wayバインディング(上位から下位、host-to-child):
このサンプルでは、child-propのバインディングに角括弧[[]]を使用したことが起因して、childPropの変更がhostPropへ伝播しません。
<script>
  Polymer({
    is: 'child-element',
    properties: {
      childProp: {
        type: String,
        notify: true
      }
    }
  });
</script>
<dom-module id="host-element">
  <template>
    <!-- "hostProp"の値が、下位である子エレメントの"childProp"へ伝播する -->
    <!-- "childProp"の値は、上位であるホストエレメントで無視される(角括弧が起因して) -->
    <child-element child-prop="[[hostProp]]"></child-element>
  </template>
  ...
</dom-module>
例3 two-wayバインディング(上位から下位、host-to-child):
このサンプルでは、childPropにnotify: trueが指定されないことが起因して、childPropの変更がhostPropへ伝播しません。
<script>
  Polymer({
    is: 'child-element',
    properties: {
      childProp: {
        type: String  // notify: true が無い!!
      }
    }
  });
</script>
<dom-module id="host-element">
  <template>
    <!-- "hostProp"の値が、下位である子エレメントの"childProp"へ伝播する -->
    <!-- "childPrp"の値は、上位であるホストエレメントで無視される(notify: falseが起因して) -->
    <child-element child-prop="{{hostProp}}"></child-element>
  </template>
  ...
</dom-module>
例4 two-wayバインディング(下位から上位、child-to-host):
このサンプルでは、childPropにreadOnly: trueが指定されることが起因して、hostPropの変更がchildPropに伝播しません。ただしchildPropの変更はhostPropへ伝播されます。childPropはリードオンリープロパティなので自動で生成される_setプロパティ(value)というsetterを使用しなくてはなりません。詳細は「リードオンリープロパティ」を参照ください。
<dom-module id="child-element">
  <template>
    <div>childProp: <span>{{childProp}}</span></div>
    <div>
      <input id="childInput" on-input="_childInputOnInput" placeholder="childProp">
    </div>
  </template>
  <script>
    Polymer({
      is: 'child-element',
      properties: {
        childProp: {
          type: String,
          notify: true,
          readOnly: true  // readOnly: true を指定!!
        }
      },
      _childInputOnInput: function (event) {
        // "childProp"の値が、上位であるホストエレメントの"hostProp"へ伝播する。
        // リードオンリープロパティは、自動で生成される"_setプロパティ(value)"
        // というsetterで値を設定しなくてはならない
        this._setChildProp(this.$.childInput.value);
      }
    });
  </script>
</dom-module>
<dom-module id="host-element">
  <template>
    <!-- "hostProp"の値は、下位である子エレメントで無視される(readOnly: trueが起因して) -->
    <child-element child-prop="{{hostProp::child-prop-changed}}"></child-element>
    <div><input value="{{hostProp::input}}" placeholder="hostProp"></div>
  </template>
  <script>
    Polymer({
      is: 'host-element',
      properties: {hostProp: String}
    });
  </script>
</dom-module>
例5 two-wayバインディング(矛盾した状態):
このサンプルでは、hostPropの変更はreadOnly: trueが起因してchildPropへ伝播されず、またホストエレメントでのchildPropのバインディングに角括弧[[]]が使用されたことが起因して、childPropの変更はhostPorpへ伝播されません。つまりバインディングしても双方向にデータが伝播されない状態になっています。
<script>
  Polymer({
    is: 'child-element',
    properties: {
      childProp: {
        type: String,
        notify: true,
        readOnly: true
      }
    }
  });
</script>
<dom-module id="host-element">
  <template>
    <!-- "hostProp"の値は、下位である子エレメントで無視される(readOnly: trueが起因して) -->
    <!-- "childProp"の値は、上位であるホストエレメントで無視される(角括弧が起因して) -->
    <!-- つまりバインディングする意味がない -->
    <child-element child-prop="[[hostProp]]"></child-element>
  </template>
  ...
</dom-module>
変更通知の仕組み
プロパティでnotify: trueが指定されると、Polymerはイベントを発火してデータ変更を上位へ伝播します:
- プロパティが変更されると、エレメントは関連するホストへ変更を通知するためにイベントを発火します。
- イベント名は
<property>-changed の命名規則に従います。例えばuserNameというプロパティの場合はuser-name-changedというイベント名になります。 - このイベントのハンドラに渡されるイベントオブジェクトには、変更された新しい値が設定されており、
event.detail.valueでアクセスできます。
次のサンプルではプロパティ変更のイベントリスナをlistenersで設定しています(イベントリスナ設定の詳細はこちらを参照ください):
<dom-module id="custom-element">
  <template>
    <div>私は <strong><span id="userNameLabel"></span></strong> です。</div>
    <input value="{{userName::input}}" placeholder="ユーザー名">
  </template>
  <script>
    Polymer({
      is: "custom-element",
      properties: {
        userName: {
          type: String,
          notify: true,
          value: "Taro"
        }
      },
      listeners: {
        // プロパティにnotify: trueが指定されると<property>-changedという
        // イベントが発火されるので、そのイベントに対するハンドラを設定している。
        'user-name-changed': '_userNameOnChanged'
      },
      _userNameOnChanged: function (event) {
        this.$.userNameLabel.textContent = event.detail.value;
      }
    });
  </script>
</dom-module>
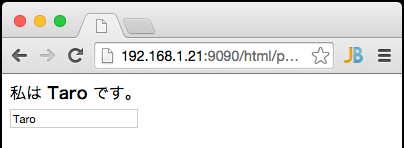
テキストインプットの入力が上部のラベルと同期します。
次のサンプルではイベントアノテーションでプロパティ変更のイベントリスナを設定しています(イベントアノテーションの詳細はこちらを参照ください):
<dom-module id="custom-element">
  <template>
    <input value="{{userName::input}}" placeholder="ユーザー名">
  </template>
  <script>
    Polymer({
      is: "custom-element",
      properties: {
        userName: {
          type: String,
          notify: true,
          value: "Taro"
        }
      }
    });
  </script>
</dom-module>
<dom-module id="host-element">
  <template>
    <div>私は <strong><span id="userNameLabel"></span></strong> です。</div>
    <!-- イベントアノテーションで`userName`のイベントリスナを設定 -->
    <custom-element on-user-name-changed="_userNameOnChanged"></custom-element>
  </template>
  <script>
    Polymer({
      is: "host-element",
      _userNameOnChanged: function (event) {
        this.$.userNameLabel.textContent = event.detail.value;
      }
    });
  </script>
</dom-module>
テキストインプットの入力が上部のラベルと同期します。

ネイティブエレメントのtwo-wayバインディング
ネイティブエレメントまたはPolymer以外のエレメントのtwo-wayバインディングは、以下のアノテーションのシンタックスに従って指定することができます:
target-prop: バインドするエレメントのプロパティを指定します。hostProp:target-propとバインドするホストエレメントのプロパティを指定します。target-change-event:target-propの値変更の起因となるイベント名を指定します。
<!-- `input`イベントをリッスンし、`hostValue`プロパティを<input>.valueへ設定する -->
<input value="{{hostValue::input}}" placeholder="hostValue">

<!-- `change`イベントをリッスンし、`hostChecked`プロパティを<input>.checkedへ設定する -->
<input type="checkbox" checked="{{hostChecked::change}}">
Polymerエレメントのtwo-wayバインディングでは、デフォルトの命名規則が適用されるため、イベント名の指定は必須ではありません。次に示す2つの例は同じ意味となります:
<!-- `child-value-changed`イベントをリッスンする -->
<child-element child-value="{{hostValue::child-value-changed}}"></child-element>

<!-- デフォルトの命名規則が適用され`child-value-changed`イベントをリッスンする -->
<child-element child-value="{{hostValue}}"></child-element>
次のサンプルは、上記を全て含んだ内容になっています。
<dom-module id="child-element">
  <template>
    <!-- `input`イベントをリッスンし、`childValue`プロパティを<input>.valueに設定する -->
    <input value="{{childValue::input}}" placeholder="childValue">
  </template>
  <script>
    Polymer({
      is: "child-element",
      properties: {
        childValue: {
          type: String,
          notify: true
        }
      }
    });
  </script>
</dom-module>
<dom-module id="host-element">
  <template>
    <div>
      <div>host-element :</div>
      <!-- `input`イベントをリッスンし、`hostValue`プロパティを<input>.valueに設定する -->
      <input value="{{hostValue::input}}" placeholder="hostValue">
      <!-- `change`イベントをリッスンし、`hostChecked`プロパティを<input>.checkedへ設定する -->
      <input type="checkbox" checked="{{hostChecked::change}}">
      <!-- 変更内容の表示 -->
      <div>hostChecked: <strong>{{hostChecked}}</strong></div>
    </div><br>
    <div>
      <div>child-element (その1) :</div>
      <!-- `child-value-changed`イベントをリッスンする -->
      <child-element child-value="{{hostValue::child-value-changed}}"></child-element>
    </div><br>
    <div>
      <div>child-element (その2) :</div>
      <!-- デフォルトの命名規則が適用され`child-value-changed`イベントをリッスンする -->
      <child-element child-value="{{hostValue}}"></child-element>
    </div>
  </template>
  <script>
    Polymer({
      is: "host-element",
      properties: {
        hostValue: String,
        hostChecked: {type: Boolean, value: false}
      }
    });
  </script>
</dom-module>
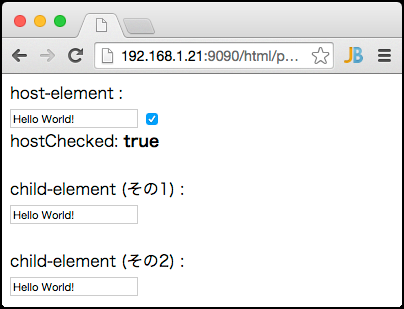
チェックボックスをクリックすると、下のラベルがtrue/falseに切り替わります。また、3つテキストインプットがありますが、このうちのいずれかで入力を行うと、入力値がその他の全てのテキストインプットに反映されます。
構造化データのバインディング
サブプロパティをバインディングするには、バインディングアノテーションでプロパティへのパスを指定します。
<template>
  <div>{{user.name}}</div>
  <input value="{{user.name::input}}">
</template>
サブプロパティの値の変更は以下の方法で行います:
- 上記の
<input>のようにエレメントとサブプロパティをバインディングして値を変更する。 Polymer.Baseのset()メソッドで値を変更する。
この方法以外で値を変更した場合は変更通知が行われず、関連する箇所の値が更新されません。
値参照のバインディング
サブプロパティのバインディングは、値参照になる場合と、値渡しになる場合があります。
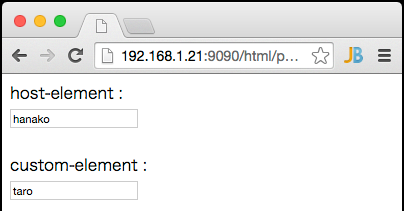
次の例では、ホストエレメント(<host-element>)が子エレメント(<custom-element>)へユーザーオブジェクト(user)の参照を渡しています。ホストエレメントと子エレメントは両方ともユーザー名を編集するテキストインプットを持ち、このテキストインプットはユーザー名(user.name)を値参照でバインディングしています。これによりどちらのテキストインプットも同じユーザーオブジェクトのユーザー名を編集することになるため、どちらでユーザー名を変更した場合でも、もう一方のテキストインプットが更新されることになります。
<dom-module id="custom-element">
  <template>
    <div>
      <div>custom-element :</div>
      <!-- 値参照のバインディングになる -->
      <input value="{{user.name::input}}" placeholder="ユーザー名">
    </div>
  </template>
  <script>
    Polymer({
      is: "custom-element",
      properties: {
        user: {type: Object}
      }
    });
  </script>
</dom-module>
<dom-module id="host-element">
  <template>
    <div>
      <div>host-element :</div>
      <!-- 値参照のバインディングになる -->
      <input value="{{user.name::input}}" placeholder="ユーザー名">
    </div><br>
    <!-- userオブジェクトの参照を渡す -->
    <custom-element user="{{user}}"></custom-element>
  </template>
  <script>
    Polymer({
      is: "host-element",
      properties: {
        user: {
          type: Object,
          value: function () { return {name: ''}; }
        }
      }
    });
  </script>
</dom-module>
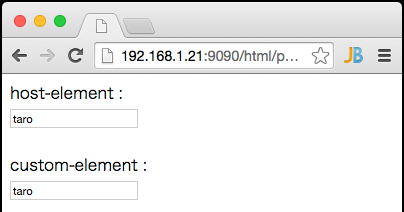
どちらのテキストインプットで入力を行っても、もう片方に入力値が反映されます。
値渡しのバインディング
次の例では、ホストエレメント(<host-element>)が子エレメント(<custom-element>)へユーザー名(user.name)を値渡ししています。なぜ<custom-element user-name="{{user.name}}">が値渡しになるかというと、子エレメントのuserNameプロパティがプリミティブ型だからです。ユーザー名の値が渡ってくるのですから子エレメントでuserNameを変更してもホストエレメントに変更内容が反映されることはありません(ただし、userNameのプロパティ設定でnotify: trueを指定すればtwo-wayバインディングになるので反映されます)。
<dom-module id="custom-element">
  <template>
    <div>
      <div>custom-element :</div>
      <input value="{{userName::input}}" placeholder="ユーザー名">
    </div>
  </template>
  <script>
    Polymer({
      is: "custom-element",
      properties: {
        userName: {type: String}
      }
    });
  </script>
</dom-module>
<dom-module id="host-element">
  <template>
    <div>
      <div>host-element :</div>
      <input value="{{user.name::input}}" placeholder="ユーザー名">
    </div><br>
    <!-- 値渡しのバインディングになる -->
    <custom-element user-name="{{user.name}}"></custom-element>
  </template>
  <script>
    Polymer({
      is: "host-element",
      properties: {
        user: {
          type: Object,
          value: function () { return {name: ''}; }
        }
      }
    });
  </script>
</dom-module>
「host-element:」でのテキストインプットの入力値は「custom-element:」のテキストインプットに反映されます。ただし「custom-element:」でのテキストインプットの入力値は「host-element:」のテキストインプットに反映されません。
パス変更通知
Polymerは変更通知を行う2つのメソッド、set(path, value)とnotifyPath(path, value)を提供します。引数のpathはパス(ホストエレメントと相対的なパス)を文字列で指定します。valueにはパスに対する新しい値を指定します。
set()は指定されたパスに値を設定し、通知を行います。
// set()で値の変更と変更通知を行う
this.set('user.name', 'Taro Yamada');
これに対してnotifyPath()は指定されたパスに値は設定せず、通知のみを行います。
// 値の変更は別で行い、notifyPath()で変更されたことを通知する
this.user.name = 'Taro Yamada';
this.notifyPath('user.name', this.user.name);
次のサンプルでは、set()かnotfy()を選んで変更通知を発行できるようになっています。結果として同じことを行っています:
<dom-module id="custom-element">
  <template>
    <div>
      <div>custom-element :</div>
      <div>
        <input type="radio" id="notifySet" name="notify" checked>set()で変更通知
      </div>
      <div>
        <input type="radio" id="notifyPath" name="notify">notifyPath()で変更通知
      </div>
      <input id="userNameInput" placeholder="ユーザー名">
      <button on-tap="_changeOnTap">変更</button>
    </div>
  </template>
  <script>
    Polymer({
      is: "custom-element",
      properties: {
        user: {type: Object}
      },
      _changeOnTap: function () {
        if (this.$.notifySet.checked) {
          // set()で値の変更と変更通知を行う
          this.set('user.name', this.$.userNameInput.value);
        } else if (this.$.notifyPath.checked) {
          // 値の変更は個別に行い、notifyPath()で変更されたことを通知する
          this.user.name = this.$.userNameInput.value;
          this.notifyPath('user.name', this.$.userNameInput.value);
        }
      }
    });
  </script>
</dom-module>
<dom-module id="host-element">
  <template>
    <div>
      <div>host-element :</div>
      <div>ユーザー名: <strong>{{user.name}}</strong></div>
    </div><br>
    <custom-element user="{{user}}"></custom-element>
  </template>
  <script>
    Polymer({
      is: "host-element",
      properties: {
        user: {
          type: Object,
          value: function () { return {name: ''}; }
        }
      }
    });
  </script>
</dom-module>

Computedバインディング
複雑なバインディングが必要な場合は
Computedバインディングで使用する関数は、バインディングとして使用するだけでなく、カスタムエレメント内の様々な用途で使用することができます。
次のサンプルでは、spanタグのtextContentは_computeFullName()の戻り値とバインドされ、_computeFullName()はfirstまたはlastが変更されるたびに再計算されます。
<dom-module id="custom-element">
  <template>
    <div>first: <input value="{{first::input}}"></div>
    <div>last: <input value="{{last::input}}"></div>
    <div>私の名前は <span>{{_computeFullName(first, last)}}</span> です。</div>
  </template>
  <script>
    Polymer({
      is: "custom-element",
      properties: {
        first: {type: String, value: ''},
        last: {type: String, value: ''}
      },
      _computeFullName: function (first, last) {
        return first + ' ' + last;
      }
    });
  </script>
</dom-module>

Computedバインディングの依存プロパティ
Computed関数の引数は依存プロパティと呼ばれ、様々なタイプの引数を含みます。Computed関数で受け取るそれぞれの依存プロパティ引数のタイプは、オブザーバー関数で受け取るものと同じです:
Computed関数は、関連する全てのプロパティが定義されるまで(!== undefinedになるまで)呼び出されません。確実にComputed関数が呼び出されるためには、関連するプロパティのデフォルト値を設定するか、ライフサイクルコールバックで初期化してください。
Computedバインディングのリテラル引数
Computedバインディングのリテラル引数には文字列と数値があります。文字列リテラルはシングルまたはダブルクォートでくくります。属性またはプロパティバインディングで、その値にダブルクォートを入れたい場合は、シングルクォートでくくってください。シングルクォートを入れたい場合は逆にしてください。
Note: リテラル文字列のカンマ
,はバックスラッシュ\でエスケープする必要があります。
<dom-module id="my-element">
  <template>
    <!-- Computedバインディングにリテラル引数を指定 -->
    <span>{{_computeFullName('Hello\, nice to meet you', first, last)}}</span>
  </template>
  <script>
    Polymer({
      is: "my-element",
      properties: {
        first: {type: String, value: 'Taro'},
        last: {type: String, value: 'Yamada'}
      },
      _computeFullName: function (message, first, last) {
        return message + ', ' + first + ' ' + last + '.';
      }
    });
  </script>
</dom-module>

最後に、Computedバインディングが依存プロパティを持たいない場合、このバインディングは一度だけ評価されます:
<dom-module id="my-element">
  <template>
    <span>{{doThisOnce()}}</span>
  </template>
  <script>
    Polymer({
      is: "my-element",
      doThisOnce: function () {
        return Math.random();
      }
    });
  </script>
</dom-module>

配列アイテムのバインディング
インデックス指定による配列アイテムのバインディングは、明確にはサポートされていません。
<!-- サポート外! -->
<span>{{array[0]}}</span>
<!-- サポート外! -->
<span>{{array.0}}</span>
バインディングで配列にアクセスするにはComputedバインディングを使用します。次のサンプルでは、Computed関数である_arrayItem()の引数にmyArray.*(配列のワイルドカード)を指定しているので、myArray配列に起こるすべての追加、削除、配列アイテムのサブプロパティ変更を監視します。
<dom-module id="bind-array-element">
  <template>
    <div>[[_arrayItem(myArray.*, 0, 'name')]]</div>
    <div>[[_arrayItem(myArray.*, 1, 'name')]]</div>
    <button on-tap="_changeOnTap">変更</button>
  </template>
  <script>
    Polymer({
      is: 'bind-array-element',
      properties: {
        myArray: {
          type: Array,
          value: [{name: 'Bob'}, {name: 'Doug'}]
        }
      },
      // 最初の引数は配列の変更の内容が格納される変更レコードで、
      // change.baseはバインディング時に指定された基準となる配列(ここではmyArray)です。
      _arrayItem: function (change, index, path) {
        // this.get(path, root)は指定されたパスの値を返します。
        // このパスは対象オブジェクト(ここではmyArray)の相対パスです。
        var value = this.get(path, change.base[index]);

        return 'index: ' + index + ', path: ' + path + ', value: ' + value;
      },
      _changeOnTap: function () {
        // myArray配列の先頭にnameが"Susan"というアイテムを追加
        this.unshift('myArray', {name: 'Susan'});
        // myArray[1]のアイテムのnameを"Rupert"に変更
        this.set('myArray.1.name', 'Rupert');
      }
    });
  </script>
</dom-module>
変更ボタンを押下するとmyArrayのアイテムに変更が行われ、これが起因してComputed関数_arrayItem()が呼び出されます。

属性のバインディングアノテーション
バインディングはプロパティに対して行うことがほとんどですが、style、class、disabledなどの属性とバンドしたい場合もあるでしょう。
属性とバインドするには、$=を使用します。これは次のプログラムと同じ意味になります:
属性バインディングは常にone-wayで、host-to-childです。属性に設定された値は「プロパティ値を属性値へ反映する」で説明したようにシリアライズされます。
<script>
  Polymer({
    is: 'custom-element',
    // 属性を定義
    hostAttributes: {
      'string-attr': ''
    },
    // プロパティを定義
    properties: {
      stringProp: String
    }
  });
</script>
<dom-module id="host-element">
  <template>
    <!-- 属性値のバインドは`$=`で行う -->
    <custom-element string-attr$="{{stringValue}}"></custom-element>
    <!-- プロパティのバインドは通常どおり`=`で行う -->
    <custom-element string-prop="{{stringValue}}"></custom-element>
  </template>
  <script>
    Polymer({
      is: 'host-element',
      properties: {
        stringValue: {type: String, value: 'hello'}
      },
      ...
  <script>
</dom-module>
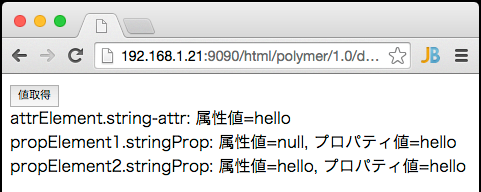
次のサンプルでは、属性バインディングとプロパティバインディングを行い、バインディング結果の値を確認するためにgetAttribute()で属性値を取得しています。値取得ボタンを押下すると、次の3パターンのバインディング結果の値が表示されます:
- 属性値のバインドを
$=で行ったケース - プロパティのバインドを通常どおり
=で行ったケース - プロパティのバインドを
$=で行ってみたケース(実験として)
<script>
  Polymer({
    is: 'custom-element',
    // 属性を定義
    hostAttributes: {
      'string-attr': ''
    },
    // プロパティを定義
    properties: {
      stringProp: String
    }
  });
</script>
<dom-module id="host-element">
  <template>
    <!-- 属性値のバインドは`$=`で行う -->
    <custom-element id="attrElement" string-attr$="{{stringValue}}"></custom-element>
    <!-- プロパティのバインドは通常どおり`=`で行う -->
    <custom-element id="propElement1" string-prop="{{stringValue}}"></custom-element>
    <!-- プロパティのバインドを`$=`で行ってみる(実験として) -->
    <custom-element id="propElement2" string-prop$="{{stringValue}}"></custom-element>

    <button on-tap="_getValueOnTap">値取得</button>
    <div id="attrResult"></div>
    <div id="propResult1"></div>
    <div id="propResult2"></div>
  </template>

  <script>
    Polymer({
      is: 'host-element',
      properties: {
        stringValue: {type: String, value: 'hello'}
      },
      _getValueOnTap: function () {
        // id="attrElement"のstring-attr属性の値を取得して表示
        var stringAttr = this.$.attrElement.getAttribute('string-attr');
        this.$.attrResult.innerHTML = 'attrElement.string-attr: 属性値=' + stringAttr;

        // id="propElement1"のstringPropプロパティの属性値とプロパティ値を取得して表示
        var stringPropAttr1 = this.$.propElement1.getAttribute('string-prop');
        var stringPropValue1 = this.$.propElement1.stringProp;
        this.$.propResult1.innerHTML =
          'propElement1.stringProp: 属性値=' + stringPropAttr1 + ', プロパティ値=' + stringPropValue1;

        // id="propElement2"のstringPropプロパティの属性値とプロパティ値を取得して表示
        var stringPropAttr2 = this.$.propElement2.getAttribute('string-prop');
        var stringPropValue2 = this.$.propElement2.stringProp;
        this.$.propResult2.innerHTML =
          'propElement2.stringProp: 属性値=' + stringPropAttr2 + ', プロパティ値=' + stringPropValue2;
      }
    });
  </script>
</dom-module>
