【Polymer 1.0】宣言型プロパティ(Declared properties)
目次
導入
カスタムエレメントで外部に対してプロパティを公開するには、Polymer()関数のプロトタイプ引数にpropertiesオブジェクトを設定します。このオブジェクトに外部へ公開するプロパティを設定することで、カスタムエレメントのユーザーはプログラムまたはマークアップからプロパティの設定を行うことができます。
以下は宣言型プロパティの簡単なサンプルです。
<script>
  Polymer({
    is: 'x-custom',
    properties: {
      user: String,
      isHappy: Boolean,
      count: {
        type: Number,
        readOnly: true,
        notify: true
      }
    },
    ready: function () {
      this.innerHTML = 'Hello World, I am a <b>Custom Element!</b>, '
        + this.user + ', I am happy? ' + this.isHappy;
    }
  });
</script>
<x-custom user="Taro" is-happy=true></x-custom>
propertiesオブジェクトには次のような設定を行うことができます:
| 設定 | 内容 |
|---|---|
Type: コンストラクタ(Boolean, Date, Number, String, Array, Object, Personのような独自クラス)ここで指定されたコンストラクタはマークアップで指定されたHTML属性をデシリアライズするために使用されます。詳細は属性のデシリアライズを参照ください。 |
|
Type: boolean, number, string, functionプロパティのデフォルト値を指定します。関数が指定された場合は戻り値がプロパティのデフォルト値になります。詳細はプロパティのデフォルト値設定を参照ください。 |
|
Type: booleanプロパティの値が変更された際、プロパティと一致する属性にも値が設定されるようにしたい場合は trueを設定してください。詳細はプロパティ値を属性値へ反映するを参照ください。 |
|
Type: booleantrueが設定された場合、プロパティを読み取り専用にします。詳細はリードオンリープロパティを参照ください。 |
|
Type: booleantrueを設定するとtwo-wayデータバインディングが利用可能になります。詳細はプロパティの変更通知とtwo-wayバインディングを参照ください。 |
|
Type: stringここで指定された文字列はプロパティ値を算出するための「関数名」と「その引数」として解釈されます。指定された関数は、引数に指定した値が変更された際に呼び出されます。Computedプロパティは常にリードオンリーです。詳細はComputedプロパティを参照ください。 |
|
Type: stringここで指定された文字列は「関数名」と解釈され、プロパティの値が変更された際に呼び出されます。詳細はプロパティ変更の監視を参照ください。 |
プロパティ名と属性名のマッピング
データバインディングを実現するには、シリアライズ(プロパティ値から属性値への変換)と、デシリアライズ(属性値からプロパティ値への変換)が必要になります。この変換には属性名とプロパティ名のマッピングも必要になります。
属性名をプロパティ名へマッピング:
- 属性名はプロパティ名への変換の際、小文字化されます。例えば
firstNameという属性名はfirstnameというプロパティ名へ変換されます。 - ダッシュ「-」付きの属性名は、ダッシュがキャピタライズされてキャメルケースのプロパティ名へ変換されます。例えば、
first-nameという属性名はfirstNameというプロパティ名へ変換されます。
この逆のマッピング、つまりプロパティ名から属性名へのマッピングにもこのルールが適用されます(reflectToAttribute: trueが設定されている場合)。
<script>
  Polymer({
    is: 'x-custom',
    properties: {
      firstName: String,
      lastName: {
        type: String,
        reflectToAttribute: true,
        value: 'Yamada'
      }
    },
    attached: function () {
      this.innerHTML = 'My user is ' + this.firstName + ' ' + this.lastName;
    }
  });
</script>
<x-custom first-name="Taro"></x-custom>

属性のデシリアライズ
プロパティの「デシリアライズ」とは属性値からプロパティ値への値変換のことを指します。propertiesオブジェクトでプロパティの設定をした場合、プロパティ名と一致する属性はtypeで指定された型へデシリアライズされ、一致するプロパティとひも付けられます。
propertiesにプロパティの設定をする際、オプション(デフォルト値やリードオンリーなど)を指定する必要がない場合、プロパティ名の後ろに直接String, Objectなど)を指定できます。
properties : {
  user : String,
},
属性値にはJSON、配列、文字列表現の日付を指定できます。Boolean型のプロパティに対する属性に関しては「属性の有り/無し」でtrue/falseが決定されます。もし属性が存在する場合、属性値がどんな文字列であろうとプロパティ値はtrueになり、属性が存在しない場合のプロパティ値はfalseになります。
<script>
  Polymer({
    is: 'x-custom',
    properties: {
      user: Object,
      manager: {
        type: Boolean
      },
      current: Date
    },
    attached: function () {
      this.innerHTML =
        'My user is ' + this.user.first + ' ' + this.user.last + '.<br/>' +
        'This user is ' + (this.manager ? '' : 'not') + ' a manager.<br/>' +
        this.current;
    }
  });
</script>
<x-custom user='{"first":"Taro","last":"Yamada"}' manager
          current="2015/08/01 18:00"></x-custom>
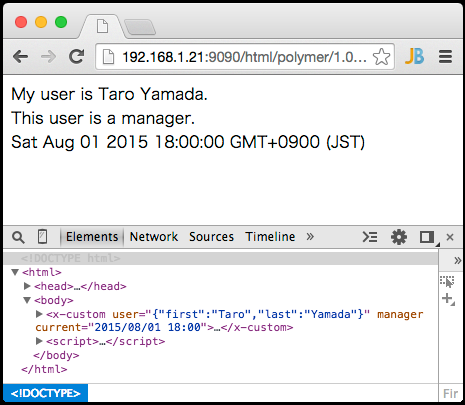
Note: 属性値の設定は
setAttribute()メソッドで設定することができます。ただし属性値の設定は静的なマークアップでのみ行うことが推奨されています。なので、属性値の設定は初期設定としてマークアップで行い、実行中はプロパティに対して値を設定するのがよいでしょう。
プロパティのデフォルト値設定
プロパティのデフォルト値はpropertiesオブジェクトのvalueフィールドを使用して設定します。このフィールドに設定する値はプリミティブ値または関数になります。関数を指定した場合は戻り値がプロパティの値になります。プロパティの型がObjectまたはArrayの場合は、valueフィールドに関数を指定してオブジェクトの初期化を行うことが推奨されます。
Polymer({
  is: 'x-custom',
  properties: {
    mode: {
      type: String,
      value: 'auto'
    },
    data: {
      type: Object,
      notify: true,
      value: function () { return {}; }
    }
  }
});
プロパティ変更の監視
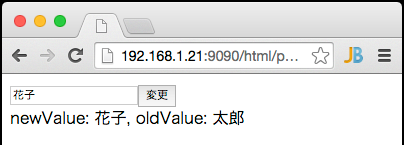
プロパティの監視は、propertiesオブジェクトのobserverプロパティを指定することによって行うことができます。observerプロパティには変更時に呼び出される関数名を文字列で指定します。プロパティが変更されると、指定された関数の引数に新しい値と古い値が設定され、呼び出されます。
<dom-module id="x-custom">
  ...
  <script>
    Polymer({
      is: 'x-custom',
      properties: {
        user: {
          type: String,
          // 変更時に呼び出される関数名を文字列で指定
          observer: '_userChanged'
        }
      },
      // userプロパティが変更された際のハンドラ
      _userChanged: function (newValue, oldValue) {
        ...
      },
      ...
    });
  </script>
</dom-module>
複数のプロパティを監視
複数のプロパティ設定の変更を監視するにはobservers配列を使用します。
observersは、propertiesで定義するobserverと比べて以下のような違いがあります:
observersは関連するすべてのプロパティが一旦定義されるまで呼び出されません(!== undefined)。そのため、それぞれのプロパティはpropertiesのvalueでデフォルト値を設定するか、いずれかのライフサイクルメソッドで初期化を行い、オブザーバーの呼び出しが確保されるよう注意してください。observersは引数に新しい値のみ受け取り、古い値は受け取れません。propertiesで定義するobserverでのみ新しい値と古い値が受け取れます。
observersプロパティには変更時に呼び出される関数名を文字列で指定し、引数に監視対象のプロパティを指定します(複数指定可)。
Polymer({
  is: 'x-custom',
  properties: {
    first: String,
    last: String,
    age: Number
  },
  observers: [
    // オブザーバー関数の引数に監視対象のプロパティを指定
    '_updateUser(first, last, age)'
  ],
  _updateUser: function (first, last, age) {
    // ここに変更時の処理を記述
  }
});
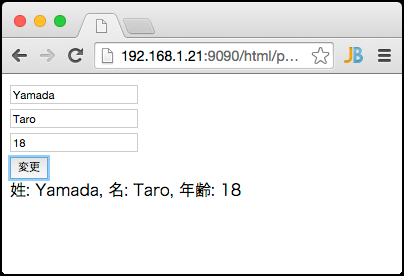
次のサンプルでは、姓、名、年齢のいずれかを入力して変更ボタンを押下すると、オブザーバー関数が呼び出され、画面下部の表示領域が更新されます。
<!DOCTYPE html>
<html>
<head>
  <script src="../bower_components/webcomponentsjs/webcomponents-lite.min.js"></script>
  <link rel="import" href="../bower_components/polymer/polymer.html">
</head>
<body>
<x-custom></x-custom>
<dom-module id="x-custom">
  <template>
    <input id="lastInput" is="iron-input" placeholder="姓"><br/>
    <input id="firstInput" is="iron-input" placeholder="名"><br/>
    <input id="ageInput" is="iron-input" placeholder="年齢"><br/>
    <button on-tap="_editUserOnTap">変更</button>
    <div>姓: <span id="lastValue"></span>, 名: <span id="firstValue"></span>, 年齢: <span id="ageValue"></span></div>
  </template>
  <script>
    document.addEventListener('WebComponentsReady', function () {
      Polymer({
        is: 'x-custom',
        properties: {
          last: String,
          first: String,
          age: Number
        },
        observers: [
          // オブザーバー関数の引数に監視対象のプロパティを指定
          '_updateUser(first, last, age)'
        ],
        // 指定プロパティのいずれかが変更された際のハンドラ
        _updateUser: function (first, last, age) {
          this.$.lastValue.textContent = last;
          this.$.firstValue.textContent = first;
          this.$.ageValue.textContent = age;
        },
        // 変更ボタンがクリックされた際のハンドラ
        _editUserOnTap: function (e) {
          this.last = this.$.lastInput.value;
          this.first = this.$.firstInput.value;
          this.age = this.$.ageInput.value;
        }
      });
    });
  </script>
</dom-module>
</body>
</html>
サブプロパティの監視
observersではオブジェクトのサブプロパティの監視を行うことができます。サブプロパティへのパス(user.nameのような)を引数に指定してください。オブザーバー関数が呼び出される際に渡されてくる引数は変更されたサブプロパティの値となります。
var User = function(name) {
  this.name = name;
};

Polymer({
  is: 'x-custom',
  properties: {
    user: {
      type: User,
      value: function () { return new User(); }
    }
  },
  observers: [
    // オブザーバー関数に監視対象のサブプロパティを指定
    '_userNameChanged(user.name)'
  ],
  _userNameChanged: function (name) {
    // ここに変更時の処理を記述
  }
});
サブプロパティを監視するには、以下の方法で値を変更する必要があります。でないと値を変更してもオブザーバー関数が呼び出されません。
- エレメントのプロパティバインディングを使用してサブプロパティの値を変更する。
Polymer.Baseのset()メソッドを使用してサブプロパティの値を変更する。
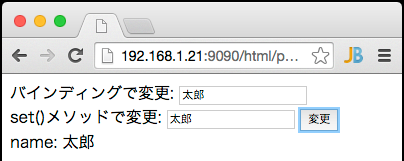
次のサンプルは上記2つの方法を使用してサブプロパティの値を変更しています。
<!DOCTYPE html>
<html>
<head>
  <script src="../bower_components/webcomponentsjs/webcomponents-lite.min.js"></script>
  <link rel="import" href="../bower_components/polymer/polymer.html">
  <link rel="import" href="../bower_components/iron-input/iron-input.html">
</head>
<body>
<x-custom></x-custom>
<dom-module id="x-custom">
  <template>
    <div>
      <span>バインディングで変更:</span>
      <!-- このテキストインプットで変更を行うと_userNameChanged()が呼び出される -->
      <input is="iron-input" bind-value="{{user.name}}" placeholder="名前">
    </div>
    <div>
      <span>set()メソッドで変更:</span>
      <input id="nameInput" is="iron-input" placeholder="名前">
      <button on-tap="_editUserNameOnTap">変更</button>
    </div>
    <div>name: <span id="nameValue"></span></div>
  </template>
  <script>
    document.addEventListener('WebComponentsReady', function () {
      var User = function(name) {
        this.name = name;
      };

      Polymer({
        is: 'x-custom',
        properties: {
          user: {
            type: User,
            value: function () {
              return new User();
            }
          }
        },
        observers: [
          // オブザーバー関数に監視対象のサブプロパティを指定
          '_userNameChanged(user.name)'
        ],
        // user.nameが変更された際のハンドラ
        _userNameChanged: function (name) {
          this.$.nameValue.textContent = name;
        },
        // 「set()メソッドで変更」の変更ボタンがクリックされた際のハンドラ
        _editUserNameOnTap: function (e) {
          // set()メソッドを使用してサブプロパティの値を変更
          this.set('user.name', this.$.nameInput.value);
        }
      });
    });
  </script>
</dom-module>
</body>
</html>
ワイルドカードによるサブプロパティの監視
より広く深いレベルのサブプロパティの変更を監視するためには、ワイルドカード*を使用します。ワイルドカードを指定した際、オブザーバー関数に渡されてくる引数は、次のプロパティをもつオブジェクトです。
path: 変更があったサブプロパティへのパスvalue: 変更された新しい値base: 「ワイルドカードを除いたパス」と一致するオブジェクト(例: 'user.*'の場合は'user'に一致するオブジェクト)
var Address = function (postalCode) {
  this.postalCode = postalCode;
};
var User = function(postalCode, name) {
  this.address = new Address(postalCode);
  this.name = name;
};

Polymer({
  is: 'x-custom',
  properties: {
    user: {
      type: User,
      value: function () {  new User(); }
    }
  },
  observers: [
    // オブザーバー関数に監視対象のオブジェクトをワイルドカードで指定
    '_userChanged(user.*)'
  ],
  _userChanged: function (changeRecord) {
    if (changeRecord.path == 'user') {
      // userオブジェクト自身の変更があった場合の処理を記述
    } else {
      // userオブジェクトのサブプロパティに変更があった場合の処理を記述
    }
  }
});
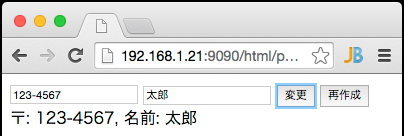
次にワイルドカードによるサブプロパティ監視のサンプルを示します:
- 変更ボタンでは、郵便番号を示す
user.address.postalCodeのようにネストしたプロパティが変更された場合でもオブザーバー関数が呼び出されるか検証します。 - 再作成ボタンでは、
userプロパティ自身に新しいオブジェクトを作成して設定した場合でもオブザーバー関数が呼び出されるか検証します。
<!DOCTYPE html>
<html>
<head>
  <script src="../bower_components/webcomponentsjs/webcomponents-lite.min.js"></script>
  <link rel="import" href="../bower_components/polymer/polymer.html">
  <link rel="import" href="../bower_components/iron-input/iron-input.html">
</head>
<body>
<x-custom></x-custom>
<dom-module id="x-custom">
  <template>
    <div>
      <input id="postalInput" is="iron-input" placeholder="郵便番号">
      <input id="nameInput" is="iron-input" placeholder="名前">
      <button on-tap="_editUserOnTap">変更</button>
      <button on-tap="_recreateUserOnTap">再作成</button>
    </div>
    <div>〒: <span id="postalValue"></span>, 名前: <span id="nameValue"></span></div>
  </template>
  <script>
    document.addEventListener('WebComponentsReady', function () {
      var Address = function (postalCode) {
        this.postalCode = postalCode;
      };
      var User = function(postalCode, name) {
        this.address = new Address(postalCode);
        this.name = name;
      };

      Polymer({
        is: 'x-custom',
        properties: {
          user: {
            type: User,
            value: function () {
              return new User();
            }
          }
        },
        observers: [
          // オブザーバー関数に監視対象のオブジェクトをワイルドカードで指定
          '_userChanged(user.*)'
        ],
        // userが変更された際のハンドラ
        _userChanged: function (changeRecord) {
          // userオブジェクト自身の変更があった場合の処理
          if (changeRecord.path == 'user') {
            this.$.postalValue.textContent = changeRecord.value.address.postalCode;
            this.$.nameValue.textContent = changeRecord.value.name;
          }
          // userオブジェクトのサブプロパティに変更があった場合の処理
          else {
            // 郵便番号に変更があった場合の処理
            if (changeRecord.path == 'user.address.postalCode') {
              this.$.postalValue.textContent = changeRecord.value;
            }
            // 名前に変更があった場合の処理
            else if (changeRecord.path == 'user.name') {
              this.$.nameValue.textContent = changeRecord.value;
            }
          }
        },
        // 変更ボタンがクリックされた際のハンドラ
        _editUserOnTap: function (e) {
          // 郵便番号、名前を変更
          this.set('user.name', this.$.nameInput.value);
          this.set('user.address.postalCode', this.$.postalInput.value);
        },
        // 再作成ボタンがクリックされた際のハンドラ
        _recreateUserOnTap: function (e) {
          // ユーザーを再作成
          this.user = new User(this.$.postalInput.value, this.$.nameInput.value);
        }
      });
    });
  </script>
</dom-module>
</body>
</html>
配列の監視
配列の変更(push, pop, shift, unshift, spliceメソッドによる配列変更)を監視するには、配列へのパスにsplicesを付加し、オブザーバー関数の引数に指定します。
splicesを付加したパスが示す配列に変更があった場合、この変更に対するオブザーバー関数は引数として次のプロパティを持つオブジェクトを受け取ります:
indexSplices: 配列に対する変更内容が格納されたオブジェクトのリストです。配列のアイテム特定に「インデックス」を使用する観点から、変更内容オブジェクトは次のプロパティを持ちます:index: 追加/削除されたアイテムの開始位置です。removed: 削除されたアイテムの配列です。addedCount:indexの位置に追加されたアイテムの数です。
keySplices:indexSplicesと同様に、配列に対する変更内容が格納されたオブジェクトのリストです。配列のアイテム特定に「キー」を使用する観点から、変更内容オブジェクトは次のプロパティを持ちます:added: 追加されたアイテムを特定するキーの配列です。removed: 削除されたアイテムを特定するキーの配列です。
var User = function(name) {
  this.name = name;
};

Polymer({
  is: 'x-custom',
  properties: {
    users: {
      type: Array,
      value: function () { return []; }
    }
  },
  observers: [
    // パスにsplicesを付加
    '_usersAddedOrRemoved(users.splices)'
  ],
  _usersAddedOrRemoved: function (changeRecord) {
    if (!changeRecord) {
      return;
    }
    changeRecord.indexSplices.forEach(function (s) {
      // 削除されたユーザーをログ表示
      s.removed.forEach(function (user) {
        console.log(user.name + ' was removed');
      });
      // 追加されたユーザー数をログ表示
      console.log(s.addedCount + ' users were added');
    }, this);
  },
  _addUserOnTap: function (e) {
    // ユーザーを追加
    this.push('users', new User(this.$.nameInput.value));
  },
  _removeUserOnTap: function (e) {
    // ユーザーを削除
    this.splice('users', e.model.index, 1);
  }
});
次に配列を監視するサンプルを示します。このサンプルでは配列にユーザーが追加/削除されることによってオブザーバー関数が呼び出されることをデバッグログで確認できます(デバッグログはブラウザの開発ツールで確認してください)。入力欄に適当な名前を入力して追加ボタンを押下すると、ユーザーが削除ボタン付きで追加されていきます。また削除ボタンでユーザーを削除できます。

<!DOCTYPE html>
<html>
<head>
  <script src="../bower_components/webcomponentsjs/webcomponents-lite.min.js"></script>
  <link rel="import" href="../bower_components/polymer/polymer.html">
</head>
<body>
<x-custom></x-custom>
<dom-module id="x-custom">
  <template>
    <div>
      <input id="nameInput" is="iron-input" placeholder="名前">
      <button on-tap="_addUserOnTap">追加</button>
      <template is="dom-repeat" items="{{users}}" as="user">
        <div>
          <span>{{user.name}}</span>
          <button on-tap="_removeUserOnTap">削除</button>
        </div>
      </template>
    </div>
  </template>
  <script>
    document.addEventListener('WebComponentsReady', function () {
      var User = function (name) {
        this.name = name;
      };

      Polymer({
        is: 'x-custom',
        properties: {
          users: {
            type: Array,
            value: function () {
              return [];
            }
          }
        },
        observers: [
          // パスにsplicesを付加
          '_usersAddedOrRemoved(users.splices)'
        ],
        _usersAddedOrRemoved: function (changeRecord) {
          if (!changeRecord) {
            return;
          }
          changeRecord.indexSplices.forEach(function (s) {
            // 削除されたユーザーをログ表示
            s.removed.forEach(function (user) {
              console.log(user.name + ' was removed');
            });
            // 追加されたユーザー数をログ表示
            console.log(s.addedCount + ' users were added');
          }, this);
        },
        _addUserOnTap: function (e) {
          // ユーザーを追加
          this.push('users', new User(this.$.nameInput.value));
        },
        _removeUserOnTap: function (e) {
          // ユーザーを削除
          this.splice('users', e.model.index, 1);
        }
      });
    });
  </script>
</dom-module>
</body>
</html>
配列をワイルドカードで監視
配列のパスにワイルドカードを指定すると、パスにsplicesを付加した監視に加え、配列アイテムのサブプロパティの監視も行うことができます。次の例では、配列に起こるすべての追加、削除、配列アイテムのサブプロパティ変更を監視します。
Polymer({
  is: 'x-custom',
  properties: {
    users: {
      type: Array,
      value: function () { return []; }
    }
  },
  observers: [
    // パスにワイルドカードを付加
    '_usersAddedOrRemoved(users.*)'
  ],
  _usersAddedOrRemoved: function (changeRecord) {
    if (!changeRecord) {
      return;
    }
    if (changeRecord.path == 'users.splices') {
      // 配列に対してユーザーの追加または削除があった場合の処理を記述
    } else {
      // 配列に格納されたユーザーのサブプロパティに変更があった場合の処理を記述
    }
  }
});
次に配列をワイルドカードで監視するサンプルを示します。配列の監視のサンプルと同様に、配列にユーザーが追加/削除されることによってオブザーバー関数が呼び出されることに加え、配列に格納されたユーザーのサブプロパティに変更があった場合もオブザーバー関数が呼び出されます。「+」ボタンで配列に格納されているユーザーのサブプロパティcounterがインクリメントされ、オブザーバー関数が呼び出されます。

<!DOCTYPE html>
<html>
<head>
  <script src="../bower_components/webcomponentsjs/webcomponents-lite.min.js"></script>
  <link rel="import" href="../bower_components/polymer/polymer.html">
</head>
<body>
<x-custom></x-custom>
<dom-module id="x-custom">
  <template>
    <div>
      <input id="nameInput" is="iron-input" placeholder="名前">
      <button on-tap="_addUserOnTap">追加</button>
      <template is="dom-repeat" id="userList" items="{{users}}" as="user">
        <div>
          <input is="iron-input" value="{{user.name}}">
          <span>{{user.counter}}</span>
          <button on-tap="_incrementOnTap">+</button>
          <button on-tap="_removeUserOnTap">削除</button>
        </div>
      </template>
    </div>
  </template>
  <script>
    document.addEventListener('WebComponentsReady', function () {
      var User = function (name) {
        this.name = name;
        this.counter = 0;
      };

      Polymer({
        is: 'x-custom',
        properties: {
          users: {
            type: Array,
            value: function () {
              return [];
            }
          }
        },
        observers: [
          // パスにワイルドカードを付加
          '_usersAddedOrRemoved(users.*)'
        ],
        _usersAddedOrRemoved: function (changeRecord) {
          if (!changeRecord) {
            return;
          }
          if (changeRecord.path == 'users.splices') {
            changeRecord.value.indexSplices.forEach(function (s) {
              // 削除されたユーザーをログ表示
              s.removed.forEach(function (user) {
                console.log(user.name + ' was removed');
              });
              // 追加されたユーザー数をログ表示
              console.log(s.addedCount + ' users were added');
            }, this);
          } else {
            // パスからインデックスの取り出し
            // 例: "users.12.counter"または"users.#12.counter"
            //     のようなパスから"12"を取り出す
            var found = changeRecord.path.match(/^users.#?(\d+)/);
            if (!found) {
              return;
            }
            var index = parseInt(found[1]);
            // 取得したインデックスで編集されたユーザーを取得
            var user = changeRecord.base[index];
            // 編集されたユーザー数をログ表示
            console.log(user.name + ' was edited');
          }
        },
        _addUserOnTap: function (e) {
          // ユーザーを追加
          this.push('users', new User(this.$.nameInput.value));
        },
        _removeUserOnTap: function (e) {
          // ユーザーを削除
          this.splice('users', e.model.index, 1);
        },
        _incrementOnTap: function (e) {
          // ユーザーのカウンターをインクリメント
          var model = e.model;
          var user = model.user;
          model.set('user.counter', user.counter + 1);
        }
      });
    });
  </script>
</dom-module>
</body>
</html>
配列を変更するためのメソッド
Polymerエレメントのプロトタイプには、配列を変更するためのメソッドが提供されています。これらのメソッドは、第一引数がpathであることを除いて、ネイティブのArrayが持つメソッドに基づき作られています。第一引数のpathは、変更があった配列のアイテムを特定するためのものです。後に続く引数はネイティブのArrayが持つメソッドと同じになります。
次に示すメソッドは配列の変更を行い、配列とバインドされている他のエレメントに通知を行います。配列を監視(オブザーバー、Computedプロパティ、データバインディング)しているエレメントと同期をとるには、これらのメソッドを使用する必要があります。
すべてのPolymerエレメントは配列を変更するための次のメソッドを持ちます:
push(path, item1, [..., itemN])pop(path)unshift(path, item1, [..., itemN])shift(path)splice(path, index, removeCount, [item1, ..., itemN])
次に一部のメソッドの使用例を示します:
Polymer({
  is: 'x-custom',
  properties: {
    users: {
      type: Array,
      value: function () { return []; }
    }
  },
  addUser: function (user) {
    // 配列にユーザーを追加
    this.push('users', user);
  },
  removeUser: function (user) {
    // 配列からユーザーを削除
    var index = this.users.indexOf(user);
    this.splice('users', index, 1);
  }
});
リードオンリープロパティ
公開したプロパティに対する意図しない変更を防ぐために、プロパティをリードオンリーにすることができます。設定方法はpropertiesオブジェクトのreadOnlyフラグをtrueに設定します。リードオンリープロパティの値を変更するには、プライベート用として自動で生成される_setプロパティ(value)というsetterを使用しなくてはなりません。
<dom-module id="x-custom">
  <template>
    <div>
      <span>{{counter}}</span>
      <button on-tap="_incrementOnTap">+</button>
    </div>
  </template>
  <script>
    Polymer({
      is: 'x-custom',
      properties: {
        counter: {
          type: Number,
          value: 0,
          // このフラグをtrueに設定
          readOnly: true
        }
      },
      _incrementOnTap: function (e) {
        // リードオンリープロパティは、自動で生成される"_setプロパティ(value)"
        // というsetterで値を設定しなくてはならない
        this._setCounter(this.counter + 1);
      }
    });
  </script>
</dom-module>

Computedプロパティ
Computedプロパティとは、いくつかのプロパティをもとに算出された値をプロパティ値とする仮想的なプロパティです。
Computedプロパティの定義は、propertiesオブジェクトのcomputedにプロパティ値を算出する関数を指定します。
Polymer({
  is: 'x-custom',
  properties: {
    first: String,
    last: String,
    fullName: {
      type: String,
      computed: '_computeFullName(first, last)'
    }
  },
  _computeFullName: function (first, last) {
    return first + ' ' + last;
  }
});
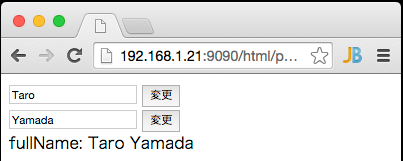
computedに設定する関数は文字列で、関連するプロパティを引数として指定します。ここで設定された関数は、引数で指定したプロパティが変更されると呼び出されます。
Computed関数は、関連する全てのプロパティが定義されるまで(!== undefinedになるまで)呼び出されません。確実にComputed関数が呼び出されるためには、関連するプロパティのデフォルト値を設定するか、ライフサイクルコールバックで初期化してください。
Computed関数の引数には大抵プロパティを指定することになると思いますが、observersで指定した関数の引数のように、サブプロパティの指定、サブプロパティをワイルドカードで指定、配列を指定、配列をワイルドカードで指定を行うこともできます。次に例を示します:
// サブプロパティを指定
properties: {
  user: User,
  computedName: {
    type: String,
    computed: '_computedNameFunc(user.first, user.last)'
  }
}

// サブプロパティをワイルドカードで指定
properties: {
  user: User,
  computedName: {
    type: String,
    computed: '_computedNameFunc(user.*)'
  }
}

// 配列を指定
properties: {
  users: Array,
  computedName: {
    type: String,
    computed: '_computedNameFunc(users.splices)'
  }
}

// 配列をワイルドカードで指定
properties: {
  users: Array,
  computedName: {
    type: String,
    computed: '_computedNameFunc(users.*)'
  }
}
Note: Computed関数の定義は、
observersで指定した関数の定義と同じように見えます。また実際にこの2つの関数の動作はほとんど同じです。唯一の違いはComputed関数は値を返し、その値が仮想的なプロパティとして外部に公開されることです。
プロパティ値を属性値へ反映する
カスタムエレメントのプロパティ値を属性値へ反映するには、propertiesオブジェクトのプロパティ設定でreflectToAttribute: trueを設定します。この設定により、プロパティがシリアライズ(プロパティ値から属性値への変換)され、プロパティとひも付く属性へ値が変換されることになります。
デフォルトのシリアライズでは、プロパティにtypeが指定されていたとしてもこれは無視され、プロパティに設定されている値の型をもとにしてシリアライズが行われます:
String: シリアライズは行われません(プロパティ値がそのまま属性値になります)。Date, Number:toString()でシリアライズされます。Boolean:trueの場合は属性が現れ、falseの場合は属性は現れません。Array, Object:JSON.stringify()でシリアライズされます。
独自のシリアライズを行いたい場合は、Polymer.Baseのserializeメソッドをオーバーライドしてください。
次にプロパティ値を属性値へ反映するサンプルを示します。userプロパティの値はJSON、managerプロパティの値はBoolean型、currentプロパティの値はDate型です。これらのプロパティは実行画像の赤枠で示すような属性値にシリアライズされます。

<!DOCTYPE html>
<html>
<head>
  <script src="../bower_components/webcomponentsjs/webcomponents-lite.min.js"></script>
  <link rel="import" href="../bower_components/polymer/polymer.html">
</head>
<body>
<x-custom></x-custom>
<script>
  document.addEventListener('WebComponentsReady', function () {
    Polymer({
      is: 'x-custom',
      properties: {
        user: {
          type: Object,
          value: {
            first: 'Taro',
            last: 'Yamada'
          },
          reflectToAttribute: true
        },
        manager: {
          type: Boolean,
          value: true,
          reflectToAttribute: true
        },
        current: {
          type: Date,
          value: function () {
            return new Date();
          },
          reflectToAttribute: true
        }
      },
      attached: function () {
        this.innerHTML = 'My user is ' + this.user.first + ' ' + this.user.last + '.<br/>'
          + 'This user is ' + (this.manager ? '' : 'not') + ' a manager.<br/>'
          + this.current;
      }
    });
  });
</script>
</body>
</html>